Lifeline Stanchion Backing Plates
--Blogpost written by Bob
Lifelines are (wire rope) railings that go around the perimeter of the boat to keep people from falling overboard. S/V Rainy Days has (wire rope) gates in the lifelines at midship on both sides of the boat for ease of boarding.
Our two-level lifelines (replaced about 3 to 4 years ago) are constructed from two different sizes of stainless steel wire rope and are supported at the bow and stern pulpits and by five stanchions on each side of the boat between the bow and stern pulpits. The two stanchions that are next to each midship gate are additionally supported by diagonal struts and are very stable--I don't anticipate the need for improved backing plates for these four stanchions.
Original Backing Plates
There are three stanchions on each side (for a total of six) that need additional support below decks. I decided to add redesigned backing plates to only four of the six stanchion bases at this time because I have to remove some insulation in the ceiling of the v-berth to access the remaining two backing plates.
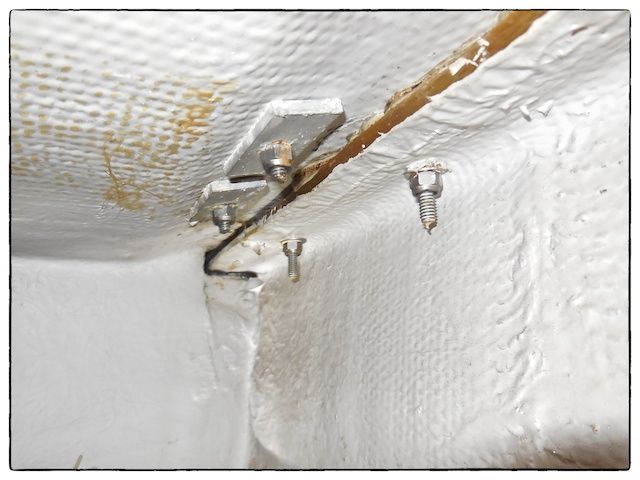 |
| Originally, each stanchion base had two small twin backing plates that conform to the sloped area where the cored deck meets the hull-to-deck joint. The sloped area created a situation that was less than ideal for merely tightening the bolts in the stanchion bases. |
New Design for Backing Plates
My goal was to increase the area and stiffness of the backing plates. By making a lip on the backing plate, the backing plate would be parallel to the deck surface and the bolts would be perfectly perpendicular.
I came up with the idea of using a single semicircular backing plate with a 3-1/2-inch radius--this provided a support area of 38.5 square inches while the original twin backing plates cover a total area of only 4 square inches.
 |
| This was the original design sketch before I improved the design of the lip. |
To get the most strength, I decided to make the semicircular backing plates from 1/4-inch thick aluminum (6061). (Some boats, Camper Nicholsons in particular, have threaded aluminum backing plates embedded in the fiberglass deck.) The 1/4-inch thick aluminum plate was ordered from Grainger.
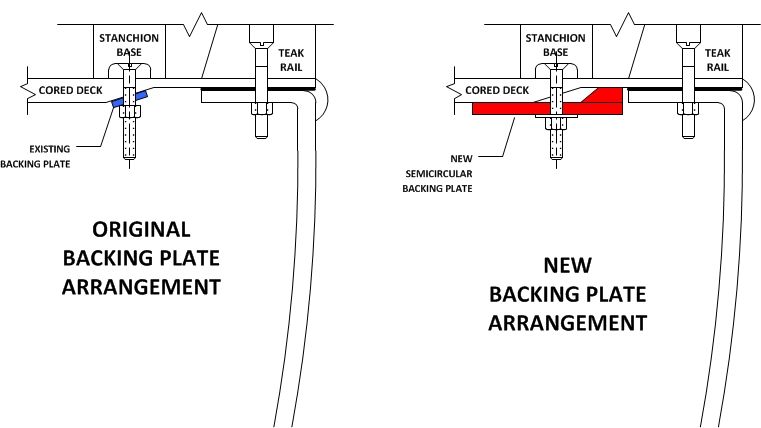 |
| An illustration of the cross section of the original backing plate arrangement and the new backing plate arrangement with the improved lip design. |
Fabrication
Like I've done on several other projects, I made adhesive-backed templates to provide guidelines for cutting and drilling the backing plates. I adhered the four semi-circular templates to the 12-inch x 12-inch piece of aluminum plate and I cut one of the four semi-circular shapes using a carbide tipped jigsaw blade in my Bosch jigsaw. The carbide tipped blades are expensive they did a very slow painstaking (over 2 hours for one backing plate) job of cutting the 1/4-inch thick aluminum plate.
Without going into detail, there were two design iterations on the lip. The final design iteration of the lip involved construction using 1/2-inch thick black Starboard and was cut-to-shape using my bench saw. I cut the inboard edge at a 45-degree angle and the outboard edge square.
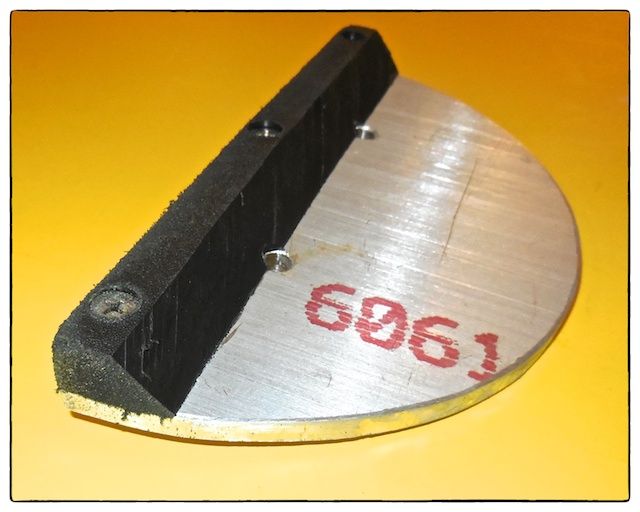 |
| The lip is fastened to the aluminum plate using three #10 flat head screws with nylock nuts on the underside. |
Installation
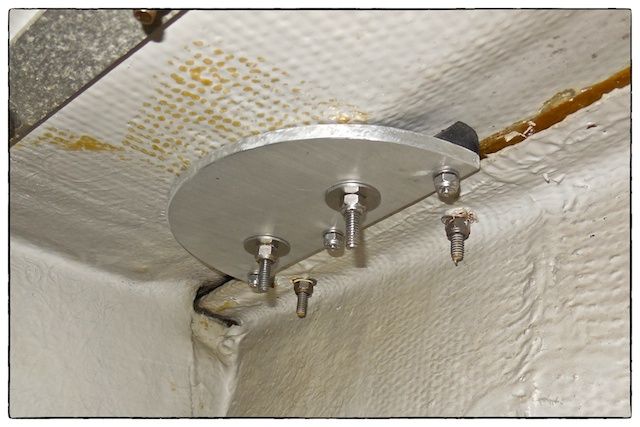
On the boat, we removed the aftmost twin backing plates on the starboard side since this location had the easiest access. With Maggie's help above deck holding the screw heads from turning, removing the bolts and backing plates was relatively easy. We placed the new backing plates in position and inserted new 2-1/2-inch long cap screws. We used 1-inch diameter fender washers and nylock nuts to complete the installation. The installation of one new backing plate took about 20 minutes.
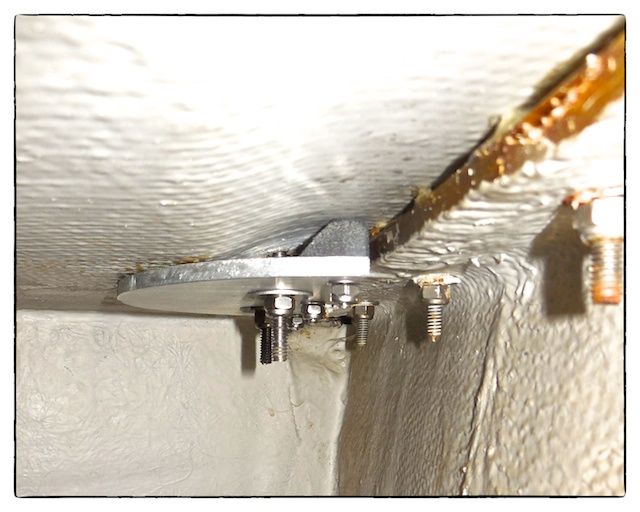 |
| This is an end view of the newly installed improved backing plates. The function of the lip is easy to understand in this view. |
 |
| In this view the greatly increased area of the new backing plates can be realized. |
Summary
Cutting out just one semicircular backing plate took about 2 hours and 4 carbide-tipped jigsaw blades. I found more appropriate jigsaw blades with bigger teeth (with 8 teeth per inch made specifically for cutting aluminum) for subsequent fabrication and in researching some online forums on metal fabrication I found out that running the (variable speed) jigsaw slower and using WD-40 (or wax) as a lubricant greatly improves cutting the 1/4-inch aluminum plate.
This blogpost covers only the first backing plate--there are three more to go to complete the initial batch of four. I will append this blogpost as others are made and installed. The cost of this project was less than $100 (including all materials for all four backing plates), assuming I don't need a lot more jigsaw blades to finish the job.
The one refitted stanchion still has a small wobble since about 70% of the wobble was fixed with the new more stable backing plate. The remaining wobble is due to slop between the stanchion and the base. As soon as the weather improves I will address the remaining wobble.
Calling this project complete (a little prematurely, I might admit), makes 148 completed boat projects! I pulled a couple of projects off my future boat project list to cause a reduction down to 50 projects to go! We are 3/4 done with 20 months to go until we leave. This also means that we have to compete about 2.5 projects per month, which is doable.
Calling this project complete (a little prematurely, I might admit), makes 148 completed boat projects! I pulled a couple of projects off my future boat project list to cause a reduction down to 50 projects to go! We are 3/4 done with 20 months to go until we leave. This also means that we have to compete about 2.5 projects per month, which is doable.
Thanks for following our blog!
No comments:
Post a Comment