Auxiliary Diesel Tank
Part 1: System Design
--Blog post written by Bob
With a little over two years until we throw off the dock lines, I really don't like the idea of adding projects to our list but as things change we have to adjust and take advantage of new opportunities like this one--adding an auxiliary fuel tank.
The primary diesel fuel tank that was recently replaced (refer to my blog post dated February 4, 2014) holds 32 gallons but only about 30 gallons are useable. (The reason that the complete tank capacity is not useable is because the fuel is sucked out of the tank via a dip tube and the dip tube doesn't quite reach the bottom of the tank.) At 2/3 gallon per hour (our average fuel consumption), the primary diesel fuel tank will provide slightly less than 45 hours of runtime.
Up until now, I had planned on carrying one 5-gallon jug of diesel fuel on deck--this would provide an additional 7.5 hours of runtime. However, since I am removing the holding tank due to the conversion to a composting toilet (refer to my blog post dated March 30, 2014), I can design an auxiliary fuel tank for that space. There are already suitably sized fill and vent connections that were used for the holding tank. Of course, I will change out these fittings and hoses to ones that are suitable for diesel service.
If I can add 20 gallons of diesel fuel, this means slightly less than 30 additional runtime hours or about 75 hours total (a 67% increase)--it is well worth the effort!
How the New Diesel Tank System will Work
When I fill up with diesel fuel, I will fill up the two tanks (primary and auxiliary) separately through their own deck fill connection. In operation, when the primary tank gets low (after 40 or more hours of running the engine), I will turn on the diesel transfer pump and watch the reduction in the level of the auxiliary tank and the increase in the level of the primary tank. This could be done while running or when stationary.
Design of the Auxiliary Diesel Tank
I made accurate dimensions of the existing holding tank area--the area can support a larger tank than the existing 15-gallon holding tank.
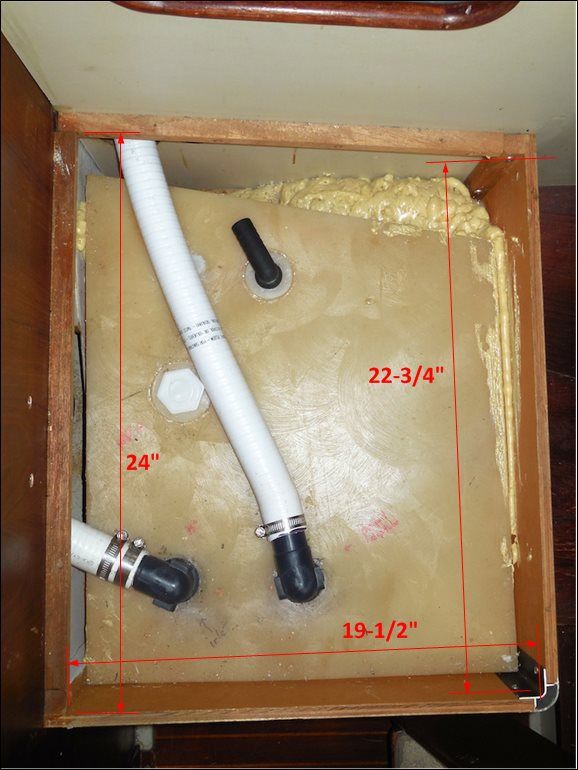 |
| Existing Holding Tank Area |
An aluminum tank shouldn't be mounted tightly against plywood (which is used all around the area where the tank will be installed) because of the potential for moisture in the plywood being trapped between the plywood and the tank and causing crevice corrosion of the tank. Therefore, I am going to fabricate plastic corner pieces to keep the tank away from the plywood--these corner pieces will be 3/8-inch thick and will have plenty of large holes to promote ventilation. I will allow a total of 1/8-inch clearance in both directions (in addition to the thickness of the corner pieces) to allow for slight variations in the new tank dimensions.
Since the thickness of my new primary (aluminum) fuel tank is 1/4-inch, I decided on 3/16-inch thick aluminum for the smaller auxiliary fuel tank and I decided against any type of external coating this time around since this tank will be installed in a very dry area of the boat.
While the top of the tank will be flat and approximately the same location as the top of the existing holding tank, the bottom must be contoured to match the existing shape of the hull beneath the navigation station seat. I have made estimates for the contour of the bottom but these will have to be accurately measured prior to fabrication of the tank.
 |
Design for New Auxiliary Fuel Tank |
The inside volume of the new tank with the assumed bottom contour is 2.92 cubic feet or 21.8 gallons--this means probably 20 usable gallons (my original goal).
Diesel Transfer Pump
A readily available and very durable diesel transfer pump (made by Marco and available from Jamestown Distributors) with a 2.6 GPM rating has 3/8" diameter inlet and outlet connections. This pump will allow the transfer of the complete auxiliary tank capacity in only 8 minutes--this seems very reasonable. So, the discharge fitting on the tank (with its internal dip tube) should be 3/8-inch diameter based on the pump connection size.
Accessories Needed
I can easily hook up an extra fuel gauge in the cockpit to monitor the level in the secondary fuel tank and the diesel transfer pump switch should be located close by.
The discharge from the diesel transfer pump can be connected into the inlet hose to the primary fuel tank and a 3/8-inch hose will have to be connected into the 1-1/2-inch inlet hose. I will have to use a 1-1/2-inch tee and and a 45-degree elbow with a reducer down to 3/8-inch diameter--this will simulate a y-fitting.
 |
New Fuel System for S/V Rainy Days |
Hoses that handle diesel fuel should be constructed from nitrile--a type of rubber that is designed for oil exposure. (Oil exposure makes conventional rubber hoses swell and rapidly deteriorate.)
An additional consideration is that the tank needs to be restrained with sturdy metal straps fastened to the boat's structure. If it is not adequately restrained, a lot of damage can be incurred by a 196-lb mass bouncing around within the boat!
Schedule
I will be on a sailing vacation for the entire month of July and I can't start this project until we can take the holding tank out of service (winter). Once the holding tank has been removed I can make accurate measurements for this tank. It will take 5 to 6 weeks to manufacture the aluminum tank. So, we are probably looking at installation during January or February 2015.
Budget for this Project
New custom-made aluminum tank (with dip tube and level sensor) - $550
Diesel transfer pump - $165
New fuel gauge for auxiliary tank - $35
Fittings to tie into 1-1/2-inch primary tank inlet hose - $150
Switch for diesel transfer pump - $30
3/8-inch x 15 feet long fuel hose - $60
1-1/2-inch x 6 feet long fuel hose - $60
New deck fitting for auxiliary tank - $50
Contingency - $110 (10% of all of the above)
Total cost - $1210
Barring any need to divert boat funds elsewhere, I plan to order the new tank by the end of August. (I am haunted by a leak in my transmission seal that may have to be repaired before this project is started!) The next blogpost (Part 2) dealing with the auxiliary diesel tank will be written sometime in November (or thereafter) when it will be time to order the tank.
Thanks for following our blog!
This is such a beneficial post for Diesel Hoses and Fittings services. If you are looking the same then must read this blog.
ReplyDelete