Row, Row, Row Your Boat...
--Blog post written by Bob
We completed the retrofit of "puddle" this week and transformed it from a piece of junk in the dinghy graveyard to a perfectly good rowing dinghy!
| We had to use white paint on the transom to cover the epoxy-filled holes--this provided a nice contrast for the dark blue vinyl lettering. Since we intend to keep this dinghy as a rowing dinghy, we used a piece of teak trim where the motor mount is normally located. |
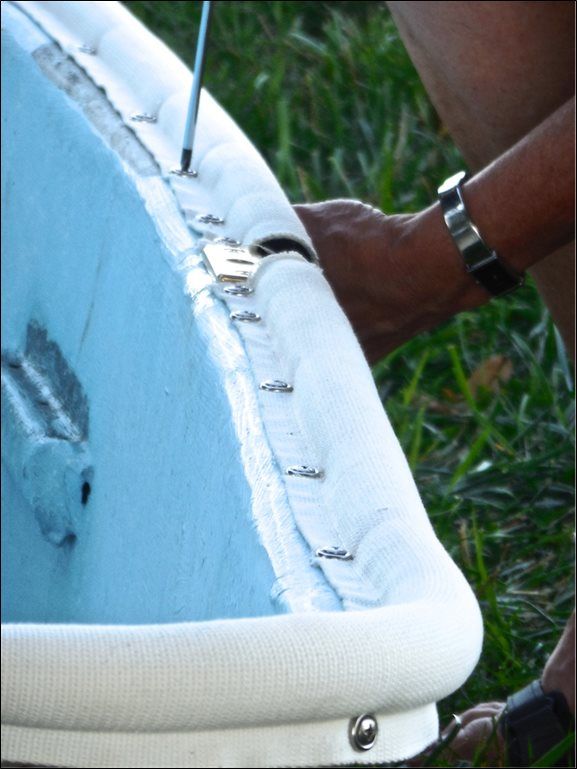 |
| We installed a Dacron-covered foam rub rail using stainless steel caps crews, finish washers and nylon-inserted nuts. A spacer was used to get a consistent 6-inch spacing on the top surface. On the outside lip we used 12-inch spacing and made sure that the pattern was offset from the pattern on the top. |
We are still waiting for the oars and oar locks to arrive but as soon as they arrive we will post a picture of the completed project. As you may recall from our last blog post, we purchased the decrepit dinghy (made by Shipmate) for $35 and we have since added $577 in materials and maybe 40 hours of our time and now it is completely rebuilt and looks new.
On this project, Maggie and I worked together and shared the work equally. It was a fun project and didn't turn into something that became overwhelming like some boat projects tend to do. It was beneficial to be able to see the progress we made as the project progressed--this just isn't possible on many of the (more complicated) boat projects.
Upgrading the Propane System
This project started out as a simple rewiring project but as we got into it further we decided to upgrade the propane controls too. Propane is used for cooking and occasionally for heating on board S/V Rainy Days. We have a gimbaled 3-burner stove with an oven and we have a wall-mounted propane fireplace. Since propane is heavier than air, any leakage would tend to accumulate in the bilge and it could present a dangerous situation if ignited.
We decided to replace the old propane control panel with a new upgraded model (Xintrex S-2A) that tests for propane leakage, as well as controlling the solenoid. We selected the propane control package without the solenoid (because I wanted to use our existing higher quality Marinetics-brand solenoid) and with a single sensor.
 |
| The old control panel did nothing more than function as a remote switching device for the solenoid that opens and closes the propane valve. |
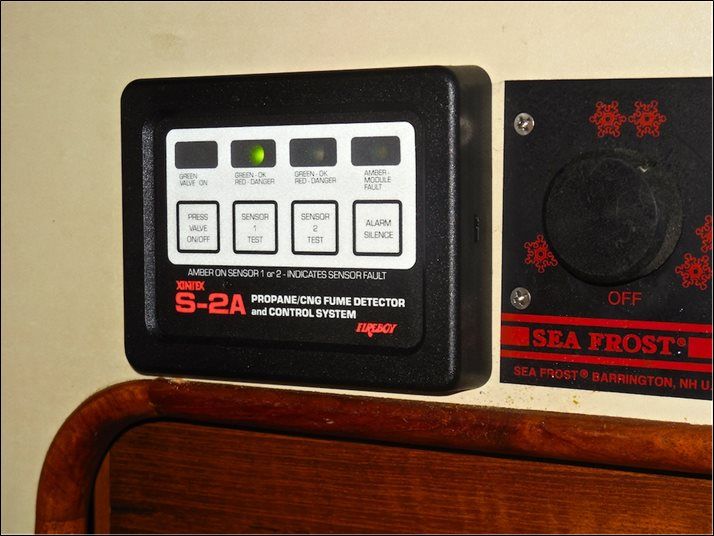 |
| The new control panel adds the safety of an automatic shut off in the event propane leakage is detected by the sensor located beneath the stove. |
We moved the location of the control panel by about 2 feet (further away from the stove) and used a spot that was made for the controls for my old engine-driven refrigeration. We covered the old holes used for the old propane control panel with a USCG-required placard about disposal of garbage, etc.
Since we upgraded all the wiring (the old wiring was the original un-tinned copper wire), this project required a lot more work than it may seem--it wasn't a matter of simply changing the control panels! To install the propane sensor, we had to completely remove the stove. (While it was removed, Maggie cleaned stove completely--this was a big job in itself!)
The total material cost for this upgrade was about $230.
Bilge Cleaning
While the transmission was removed from the boat and there no possibility of further leakage, I spent one entire weekday evening this past week cleaning out the contents of the bilge with my shop vac and properly disposing of it at the marina. What a messy job!
Transmission Rebuild
The transmission rebuild is progressing steadily after a four-day shipping delay on the parts and it is expected to be installed by the middle of next week. More about this in our next blogpost...
Thanks for following our blog!
No comments:
Post a Comment